Using with Isaac Sim
Usd Interface
cuRobo represents the world using cuboids, meshes, and nvblox maps. We provide examples for reading obstacles as meshees and cuboids from isaac sim. For other geometric primitives, we convert them to meshes and use our mesh based collision checker.
In addition to reading the world from Isaac Sim, we have some experimental code to read robot kinematics from a Usd Stage in our library that can be used to read robots directly. For the examples below, we assume that the robot is being read from our configuration file and leave Usd based kinematic parsing for a future release. The interface we have developed to work with Isaac Sim can also be used with other simulators and even the real world by adding interfacing code to parse the world from your setup.
Our interface with NVIDIA Isaac sim is shown in the below graph. We access the current stage from
Isaac Sim and load this stage into our curobo.util.usd_helper.UsdHelper. We leverage
usd-core to parse the obstacles in the stage and create
a curobo.geom.types.WorldConfig. We pass this WorldConfig to our collision checker,
which then becomes aware of obstacles in the simulation. We run this world parsing at a fixed rate
of 0.1hz to keep track of pose of the obstacles and also be aware any new obstacles in the scene.
We also trigger a world update when we interact with the scene and change the state of obstacles,
e.g., when performing pick and place tasks.
We use a cube object as the goal marker and read it’s pose from Isaac Sim into
curobo.types.math.Pose, along with the robot’s current joint state into
curobo.types.state.JointState and call our solver to compute the action. We detect when
the cube’s pose changes to trigger the solver. In case of motion generation, we obtain the full
joint trajectory, interpolated to a specified dt and send action one at a time until the
trajectory’s full time has been reached. In the case of inverse kinematics,
we do not run a controller and teleport the robot to the solved joint state. We also have an
experimental reactive control mode that solves the reacher task using MPPI, in which case the solver
gives a joint action at every simulation step to be executed.
Note
cuRobo assumes the world is represented with respect to the base frame of the robot from the kinematic chain. We leverage usd-core implementation of TF to transform all assets from the simulator to the robot’s base frame.
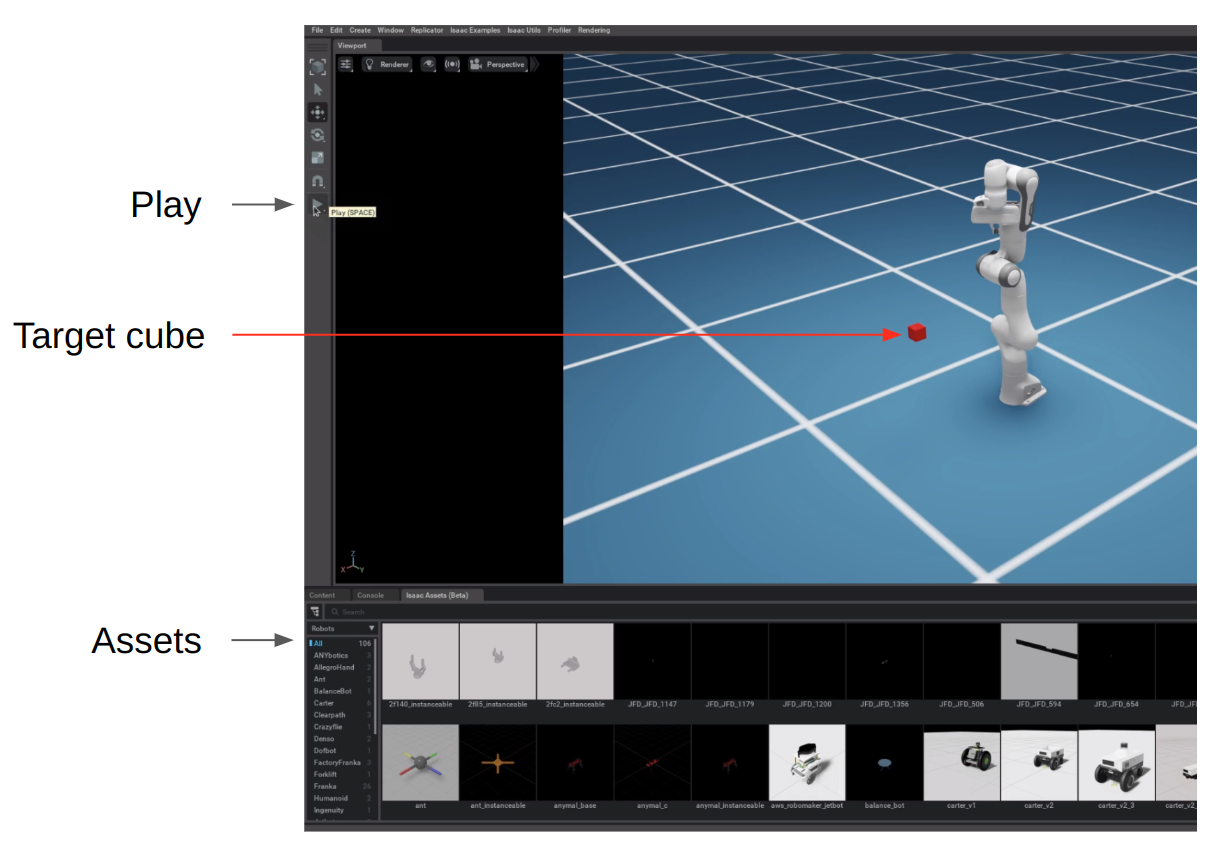
Isaac Sim Basics
All isaac sim examples in cuRobo will launch an Isaac Sim window as shown below. Isaac Sim when
launched is in a stopped simulation state and the user needs to click the “Play” button shown below
to start the simulation and the example program. The target cube shown in red can be moved by
clicking it. To test collision avoidance, a user can drag and drop meshes from the assets browser
shown below. cuRobo’s UsdHelper currently supports only single meshes (no articulation) and
we only test on the YCB objects available from the assets browser under Props dropdown section.
In the assets tab, click the Robots drop down box and select Props which will load the YCB
objects. You can then drag and drop YCB objects into the current scene and cuRobo will read these
obstacles into it’s world representation for collision avoidance.
Note
cuRobo only updates the world every 300 simulation steps, so you need to wait for the terminal
to print Updated world before executing new robot commands.
Collision Checking
Launch omni_python examples/isaac_sim/collision_checker_example.py to run a collision checking example.
You can drag and drop meshes in this tutorial to check collisions between the green sphere and the world. The sphere
will have a blue color when near obstacles and then turn to red when in collision. A red vector indicates the gradient
for the signed distance.
Motion Generation
Launch omni_python examples/isaac_sim/motion_gen_reacher.py --robot franka, which will
load the Franka Panda robot and a red cube similar to the UI above. Click the Play button and then
move the red cube. Once the red cube stops moving, a motion generation request is triggered and the
robot will move to the red cube as shown in the gif below.
Add obstacles following Isaac Sim Basics and wait for a few seconds for cuRobo to update it’s world representation. Then moving the cube will generate motions for the Franka that avoid the obstacles as shown below.
Note
Motion generation only generates motions when the robot is static. cuRobo has an experimental
mode to optimize from non-static states. You can try this by passing --reactive to
motion_gen_reacher.py. This mode will have lower success than the static mode as now the
optimization has to account for the robot’s current velocity and acceleration. The weights have
also not been tuned for reactive mode.
Reachability using Batched Collision-Free Inverse Kinematics
Reachability of a robot can be determined using batched inverse kinematics. With cuRobo’s GPU
accelerated curobo.wrap.reacher.ik_solver.IKSolver, we can solve inverse kinematics for a
batch of poses in a single pass. We sample positions on the xyz grid around the cube’s position and
compute IK solutions for all positions in the grid (with the orientation read from the cube’s pose).
We color the position as green if it has an IK solution and red if there is no IK solution.
Run examples/isaac_sim/ik_reachability.py --robot franka.yml to launch the reachability demo.
We can also compute collision-aware reachability by passing the world representation to cuRobo’s IKsolver. In the provided example, obstacles can be added to reachability analysis by drag and drop, similar to the motion generation example.
In the above video, we see that the IK solutions are not in collision with the objects. We only return
one solution per grid position. Look at curobo.wrap.reacher.ik_solver.IKSolver for more details,
including how to return many solutions per query pose.
Model Predictive Control with MPPI
cuRobo also implements a model predictive control~(MPC) framework similar to STORM, with kinematics, collision checking, and cost computations coming from cuRobo’s custom kernels. This framework also enables the use of CUDAGraphs for running a full step of MPPI. Leveraging these advancements, cuRobo’s MPPI can reach 500hz control rate on a NVIDIA RTX 4090 compared to 125hz reached by STORM.
An example application of this MPC framework is available in examples/isaac_sim/mpc_example.py.
Starting the mpc example with omni_python examples/isaac_sim/mpc_example.py --robot franka.yml will
launch the below demo. The robot will reactively try to reach the target pose given by the red cube. The
green trail of points visualize the end-effector’s position from the many parallel rollouts.
This demo also provides collision avoidance through the drag and drop interface. However, MPC is a local method and as such can get stuck in local minima behind large obstacles. In the below video, you can see the Franka Panda getting stuck behind the blue pitcher for a few seconds. Since MPPI works by sampling many trajectories in parallel, it finds a path after few seconds of exploration and moves around the pitcher.
In addition to obstacle avoidance, using MPC can provide self-collision avoidance as shown below.
Warning
cuRobo’s MPC framework is experimental and does not provide safety guarantees as the MPC optimizes constraints as cost terms with large weights, which can put the robot in a collision state if the costs are not tuned. We advise testing MPC in simulation in your task setting before deploying on a real robot.
Note
Motions from MPC will be lower in quality when compared to motions from Motion Generation as MPC tries to optimize using MPPI from a few sampled accelerations while motion generation leverages trajectory optimization to obtain more optimal trajectories.
Multi-Arm Reacher
cuRobo’s modular framework for motion generation enables trajectory generation that satisfy additional cost terms. One example task is reaching a target pose for a second link in addition to the end-effector. This can be leveraged to reach target poses in a dual arm setting, with the dual arms modeled as a single robot in cuRobo.
Run omni_python examples/isaac_sim/multi_arm_reacher.py --robot dual_ur10e.yml to start the dual-arm demo as shown below. Motion generation for the two universal robots UR10e robots to reach their respective colored cubes is triggered when the red cube stops moving. Moving the non-red cube will not trigger motion generation, instead only set the pose for that the specific link has to reach in the next trigger of motion generation.
Warning
Multi-Arm motion planning is experimental and does not work as well as single arm planning. There are open research questions on how to solve multi-arm planning and cuRobo’s current implementation is only meant to be a starting point for research in this area.
Next read about cuRobo’s world representation in Collision World Representation.