Using with Depth Camera
For working with camera depth images, we use nvblox. Nvblox takes as input depth images with camera poses and builds a Euclidean Signed Distance Field~(ESDF). nvblox is implemented to support many layers of ESDF, with segmented camera images going to different layers. In addition, nvblox enables decaying occupancy in layers, which we leverage to account for dynamic obstacles. Since a single layer with a fixed voxel size is not ideal for manipulation environments, we design a wrapper for nvblox that creates many layers with different voxel sizes, integration types, and history. This allows us to load static world objects in a base layer, dynamic obstacles in a dynamic layer, and interaction objects in a high resolution map. We pass all these layers to a single cuda kernel which iterates through all layers and returns the collision distances. We also expose APIs to update the layers with new depth images. We also provide the option to load nvblox layers from disk. We developed an pytorch interface to nvblox which is available at nvblox_torch <https://github.com/nvlabs/nvblox_torch>_ that we use in cuRobo for signed distance queries. The collision checking wrapper is implemented in curobo.geom.sdf.world_blox.WorldBloxCollision.
We will first walk through some examples that use a pre-generated nvblox map followed by reactive examples that require a depth camera.
Install cuRobo with Isaac sim following Install for use in Isaac Sim. Then install nvblox following instructions in Installing nvblox for PRECXX11_ABI and Isaac Sim.
Demos with an existing map
Collision Checking
Launching omni_python collision_checker.py --nvblox will load an existing nvblox map and a sphere. Drag the sphere around to visualize collisions. When the sphere is green, it’s not in collision. When it’s blue, it’s within activation distance of a collision, and when red, it’s in collision. A red vector indicates the gradient of the distance.
You can insert cubes and the collision checker will now sum the cost across nvblox and primitives,
You can also add meshes through the drag and drop interface (Isaac Sim Basics),
Motion Generation
Motion generation with a static nvblox map can be run with omni_python motion_gen_reacher_nvblox.py
Model Predictive Control
Reactive control with a static nvblox map can be run with omni_python mpc_nvblox_example.py
Demos with online mapping
You need a realsense camera to run the below demos. You also need to install curobo, nvblox and nvblox_torch with
Isaac Sim, following instructions in Installing nvblox for PRECXX11_ABI and Isaac Sim. Once installed, install pyrealsense2 with omni_python -m pip install pyrealsense2.
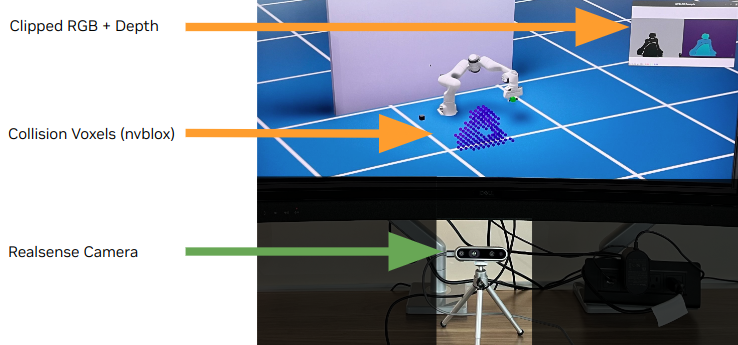
Place the camera in front of your monitor as shown below. Launching the below examples will open an isaac sim window and also open a image viewer (after clicking play) that will show the clipped RGB and depth image stream. In Isaac Sim, you will see voxels being rendered when there is an object in the image viewer.

We interface a depth camera (e.g., realsense) with cuRobo through curobo.geom.sdf.world_blox.WorldBloxCollision and send depth images at every simulation step.
The collision class will integrate the depth images into nvblox’s ESDF representation and enable collision queries for cuRobo’s motion generation techniques.
Collision Checking
We will first run a collision checking example by launching omni_python realsense_collision.py, which will open a isaac sim window with a sphere. Click Play and the sphere will
turn red when in collision with the voxels from the camera. You can also move the sphere to different locations by clicking it. You can change the pose of the camera by
moving the blue cube.
Motion Generation
Next, we will run a motion generation demo where the the robot is moving between two poses. In this demo, the world is only updated between motion planning queries so the robot
can collide with objects that appear during motion as you will see in the demo. Launch omni_python realsense_reacher.py --hq_voxels to run the demo. If your machine is
running at a framerate less than 60, don’t use the argument --hq_voxels.
Model Predictive Control
NVBLOX world representation can be used for dynamic collision avoidance with a reactive controller such as MPC (with MPPI). Launch omni_python realsense_mpc.py to start this demo, where
the robot will reach a target and try to stay there. When an obstacle appears in the scene, the robot will try to avoid the obstacle while trying to be as close as possible to the target.